Saturday, September 26, 2009
Super Size It
To use this large image in its entirety I had to use a 6 X 6 card base.
Natalie
Card Recipe
Stamps: dress (Inkadinkado), swirl (Technique Tuesday), Happy Birthday (My Sentiments Exactly)
Paper: black & white cardstock (stash), scalloped mauve cardstock (DCWV)
Ink: Staz On Jet Black
Accessories: rhinestones (stash), water colour pencils, fine black marker
Friday, September 25, 2009
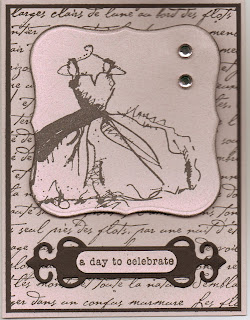
New Spellbinders Tag Dies
I am happy to have finally put one of my favourite images to use. The use of a mauve and black colour scheme, a script background stamp and the Spellbinders tag bring the vintage theme of the card together. Thanks to Steph for lending me her stamp.
Natalie
Card Recipe
Stamp: dress (Inkadinkado), sentiment (Hero Arts), background (Stampin' Up)
Paper: mauve & black cardstock (stash)
Ink: Staz On Jet Black
Accessories: Spellbinders Label 1 and Tags, rhinestones (Creating Keepsakes), Glimmer Mist (pearl)
Labels:
cardmaking,
Glimmer Mist,
Spellbinders
Thursday, September 24, 2009
Home Made Glimmer Screens
By making a die cut out of a piece of acetate I was able to make a Glimmer Screen. The Bigz Sizzix die I chose works perfectly to "support" the main image. I adhered the acetate shape to the card front with repositionable tape, sprayed the Glimmer Mist and carefully lifted the screen away from the card front.
Natalie
Card Recipe
Stamps: angel (PSX), sentiment (Flourishes)
Paper: green & gold cardstock (stash)
Ink: Encore Gold
Accessories: Glimmer Mist, Sizzix Bigz Die, brads (stash), Spellbinder Ovals
Labels:
cardmaking,
Glimmer Mist,
Spellbinders
Wednesday, September 23, 2009
Fabulous Fake Fur
Here I have used a variety of finishes and textures to decorate this image. I used a shimmery paint on his beard to give it a smooth and silky look. Although the trim of his hat is also white, I wanted to give it texture and sparkle so I used Polar White Flower Soft.
Natalie
Card Recipe
Stamp: Stamps Happen
Ink: Staz On Jet Black
Paper: white cardstock (stash), patterned paper (Daisy D's)
Accessories: water colour pencils, glimmer paints (Liquid Shimmers), Flower Soft, button (Buttons Galore)
Labels:
cardmaking,
Flower Soft,
Liquid Shimmers
Monday, September 21, 2009
Custom Framing with Spellbinders
When I saw the original version of this card I just had to "lift" it. It's wonderful to find another use for large images, such as this floral one. Here I have used only the right hand side of the image. To frame it I had to cut down a Scalloped Spellbinders Rectangle die. I first cut the original size and then moved the die cut within the die to cut off one side, still maintaining the pattern in the border.
Natalie
Card Recipe
Stamp: PSX
Paper: white cardstock & textured paper (stash)
Ink: Colorbox Black
Accessories: black embossing powder, watercolour pencils, ribbon (Making Memories), Spellbinders
Labels:
cardmaking,
Spellbinders
Sunday, September 20, 2009
One Image from Many Stamps
Here I have used a set of stamps to create a wreath. Different colours of ink make the image realistic and interesting. Thanks to Wendy for the use of her stamps.
Natalie
Card Recipe
Stamps: Stamp Tapestry
Paper: white, green & burgundy cardstock (stash)
Ink: Colorbox Evergreen, Colorbox Queue Maroon & Charcoal, Encore Metallic Gold
Accessories: Spellbinders Circles, ribbon (stash), gold brads (stash)
Labels:
cardmaking,
Quickutz Embossing Folders,
Spellbinders
Saturday, September 19, 2009
Repeating Patterns to Make a Border
Here I have used the same pumpkin punch on different papers to create an eye-catching border. Combining papers of different patterns and textures adds interest to the card.
Natalie
Card Recipe
Stamp: Hero Arts
Paper: white & black cardstock (stash), patterned (Doodlebug), foil (stash)
Ink: Staz On Jet Black
Accessories: Martha Stewart Pumpkin Punch, ribbon (Michael's)
Friday, September 18, 2009
Repeating Patterns
This is one of my favourite Hallowe'en cards! I wanted a "supporting" embellishment for my witch image and created a circle like the one in the patterned paper. Matching cardstock pulls the elements on the face of the card together.
Natalie
Card Recipe
Stamps: Stampin' Up
Paper: yellow, green, orange & black cardstock (Bazzill orange peel), patterned (Doodlebug?), white (stash)
Ink: Staz On Jet Black
Accessories: water colour pencils, brad (stash), ribbon (stash), Marvy scalloped circle punch
Thursday, September 17, 2009
Doodle a Border
Sometimes card front space doesn't allow for stamped images to be framed or matted with cardstock. For a different style of image framing simply draw squiggly lines around your image.
Natalie
Card Recipe
Stamps: Stampin' Up
Paper: black cardstock (stash), orange & green cardstock (Bazzill orange peel), patterned (Doodlebug?)
Ink: Staz On Jet Black
Accessories: fine black pen, ribbon (stash), Quickutz tag die
Wednesday, September 16, 2009
Button Border
Many companies have buttons that coordinate with their patterned papers. Take advantage of the colour matches and use them to create a border other than paper or ribbon.
Natalie
Card Recipe
Stamp: Hero Arts
Paper: green cardstock (Doodlebug/Bazzill), patterned (Doodlebug)
Ink: Staz On black
Accessories: buttons (Making Memories), black floss (stash)
Tuesday, September 15, 2009
Art Imitating Life
I stamped the same image on both yellow and orange pieces of cardstock. Then I cut out the orange pumpkin to layer on the image stamped on the yellow paper. This made the pumpkin the focal point of the card and gave the parts within the card realistic depth--the pumpkin would be closer to us than the actual window. I also used two eyelets to hold a ribbon which could be pulling back the window covering "in real life".
Natalie
Card Recipe
Stamps: Impression Obsession and Stampin' Up Aida Cloth background stamp
Paper: yellow & orange cardstock (stash)
Ink: Staz On black
Accessories: ribbon (stash), eyelets (stash)
Monday, September 14, 2009
Foiled!
Sunday, September 13, 2009
Cracked Glass Valentine
Here I have used a calendar image and antiqued it. After heat embossing multiple layers of clear embossing powder over the image, I put it in the freezer. Upon removing the image from the freezer after 5 minutes, I bent the image, thus cracking the clear embossing. I applied brown in to a sponge and swiped it across the face of the image, trying to get the ink to stay in the cracks and removing the excess at the same time. I tried to repeat patterns in the image by adding a heart to the corner of the card.
Natalie
Card Recipe
Stamp: Stampin' Up Filigree background
Paper: red & green cardstock (stash), brown (Bazzill)
Ink: Colorbox
Accessories: PSX clear embossing powder, heart punch (Marvy)
Saturday, September 12, 2009
Keeping It Simple
Here is an even simpler example of a sympathy card made with an embossing folder. This pattern is suitable for the theme, yet is sufficient to stand alone. Also keep in mind the appropriateness of a soft colour choice.
Natalie
Card Recipe
Stamp: Impression Obsession
Ink: Staz On Black
Paper: blue cardstock (stash)
Accessories: ribbon (stash), Cuttlebug embossing folder
Labels:
cardmaking,
Cuttlebug embossing folders
Friday, September 11, 2009
A Simply Elegant Sympathy Card
Sympathy cards are always a challenge. Dry embossing adds a suitable touch of elegance for this type of card. I dry embossed part of the front panel by inserting the cardstock only partially into the embossing folder. The embossed lines were done with a ruler and a stylus. The same results could be achieved with a Scor-Pal.
Natalie
Card Recipe
Stamp: Impression Obsession
Ink: Staz On Timber Brown
Paper: blue cardstock (stash), brown cardstock (Bazzill)
Accessories: ribbon (stash), Cuttlebug Swiss Dots embossing folder
Labels:
cardmaking,
Cuttlebug embossing folders
Tuesday, September 8, 2009
Where've I Been?
Had to take a pause for a very important cause. Hoped to get some posting done today, but between my husband being on my computer during the day (he's on holidays) and my daughter getting on when she gets home from school, my time has been limited. Hang in there; things will return to normal soon! Thanks for your understanding.
Natalie
Natalie
Tuesday, September 1, 2009
The Card I Meant to Post
This is the card that I had first thought of using coloured pearls on, but as you can see, they would add too much weight to the stamped image.
Natalie
Card Recipe
Stamp: PSX
Paper: off white, red & green cardstock (Bazzill), patterned (Foofala?)
Ink: Staz On Timber Brown
Accessories: markers (Marvy LePlume & Tombow), Tombow Blender Pen, ribbon (Foofala), brads (Making Memories)
Subscribe to:
Posts (Atom)