Wednesday, November 30, 2011

Just Circles


The next best thing to having an ornament stamp and matching punch is using Spellbinder Circle dies and patterned papers.

Natalie

Card Recipe
Stamp: Impress
Papers: white cardstock (Georgia Pacific), patterned (BG Wassail)
Inks: ColorBox Dark Moss & Deep Green
Accessories: ribbon (stash), fabric label (Making Memories)

Tuesday, November 29, 2011

Chunky Glitter


I was pleased to learn that chunky glitter is still translucent enough to reveal the stamped image under neath, while giving the card more texture than regular glitter.

Natalie

Card Recipe
Stamp: Just Rite
Papers: white cardstock (Georgia Pacific), green & red cardstock (Bazzill), patterned (Reminisce)
Ink: Versafine Onyx Black, Distress Tumbled Glass
Accessories: Spellbinder Circles & Scalloped Circles, ribbon (Fabricland), glitter (Elmer's), Copic markers

Monday, November 28, 2011

Sepia/Black?


The card idea I copied used black ink to stamp the image. I thought sepia might be a good idea, however, I think the black might have worked better with the red and white flower and twine.

Natalie

Card Recipe
Stamp: Inkadinkado
Paper: kraft cardstock (Bazzill)
Ink: ColorBox sepia
Accessories: twine (MS), flowers & brad (stash)

Sunday, November 27, 2011

Peaceful Dove


This cut out from an old Christmas card lent itself to tiny alpha stickers. The watermelon Bazzill cardstock was a perfect match in colour to the switch in the image.

Natalie

Card Recipe
Papers: watermelon & kraft cardstocks (Bazzill)
Accessories: Birds & Swirls embossing folder (Cuttlebug), ribbon (stash), tiny alpha letters (MLS), Spellbinder Rectangles

Saturday, November 26, 2011

Who's Driving?!


Here's another card front, which was significantly smaller than a standard card base, so I matted it with black paper. This brought out the character in the image. I'm still debating whether or not a small sentiment should be added to this...

Natalie

Card Recipe
Papers: white cardstock (Georgia Pacific), black cardstock (stash)

Friday, November 25, 2011

Still Believing


I matched the dark blue cardstock to the dark blue in the card front I took from a commercial card. This enhanced the gold frame around the image.

Natalie

Card Recipe
Paper: blue cardstock (Bazzill)

Thursday, November 24, 2011

Scrawny Santa


Can't say I'd buy a die like this again. The many small parts took some time to assemble. The die cuts had to be made several times in order to get the pieces in different colours. Lesson learned.

Natalie

Card Recipe
Papers: white cardstock (Georgia Pacific), red cardstock (Bazzill), black cardstock (stash)
Ink: Colorbox
Accessories: santa die (?), border stickers (?)

Wednesday, November 23, 2011

"Regifting"


I've "regifted" another card by mounting a card front on a new card base.

Natalie


Tuesday, November 22, 2011

The Supporting Cast


Dry embossed image without colour can get lost on a card front. A richly coloured patterned paper behind the image can give it what it needs to stand out.

Natalie

Card Recipe
Papers: white cardstock (Georgia Pacific), patterned (BG Wassail)
Ink: Distress Walnut Stain
Accessories: brass stencil (Lasting Impressions)

Monday, November 21, 2011

Building an Image


It took 3 different stamps and 4 colours of ink to build this image, but it was well worth it. Try using different combinations of your stamps to create original images.

Natalie

Card Recipe
Stamps: berries (SU), branch (Impress), acorn (Hero Arts), sentiment (Hero Arts)
Papers: off white cardstock (Staples), green cardstock (Bazzill)
Inks: ColorBox Warm Red & Dark Moss & Olive Pastel & Dark Brown
Accessories: ribbon (Fabricland)

Sunday, November 20, 2011

poinsettia


I appreciate that these poinsettia stamps by Heartfelt were made to be used with the Spellbinder Blossom 2 dies.

Natalie

Card Recipe
Stamps: Heartfelt
Papers: cardstocks (Bazzill), patterned (BG Wassail)
Inks: Distress Aged Mahogany, ColorBox Chalk Deep Green, CTMH Topiary, Copic markers, pearls (Kaiser)

Saturday, November 19, 2011

Rudolph to the 9's


Dressed Rudolph up for Christmas with some clear rhinestones.

Natalie

Card Recipe
Stamp: Inkdadinkado
Papers: white cardstock (Georgia Pacific), burgundy cardstock (Bazzill), silver cardstock (stash), patterned (stash)
Ink: Distress Aged Mahogany
Accessories: sticker (Stampendous?), rhinestones (Kaiser), border punch (EK), Spellbinder Rectangles, silver cord (stash)

Friday, November 18, 2011

Ornamental Buttons


To continue with a folk theme, I used buttons to decorate this Christmas tree.

Natalie

Card Recipe
Stamp: Hero Arts
Papers: cardstocks (Bazzill), patterned (BG Wassail)
Ink: Adirondak Raisin Dye
Accessories: tag die (Quickutz), Spellbinder Pennants & Scalloped Pennants, cord (stash), buttons (stash), brads (stash)

Thursday, November 17, 2011

Blinged Out Snowman


To give this "man" a little more pizzaz, I decorated him with a swirl of rhinestones.

Natalie

Card Recipe
Papers: green cardstock (Bazzill), patterned (BG Wassail)
Accessories: snowman punch (EK), snowflake (stash), button (stash), rhinestones (Zva)

Wednesday, November 16, 2011

Oh Deer!


To bring attention to the deer in the patterned paper, I used Glossy Accents to give his eye dimension and shine. For a change, I strung pearls on the tree, instead of lights.

Natalie

Card Recipe
Papers: cardstock (Bazzill Juneberry & Sparkle), patterned (BG Eskimo Kisses)
Ink: Distress Peeled Paint & Aged Mahogany
Accessories: tree punch (EK), string of pearls (Wendy B.), Glossy Accents, Spellbinder Classic Ovals Large, brads (BG)

Tuesday, November 15, 2011

Assorted Trees


Here I used the Nested Pennants and a variety of patterned, coordinating papers for a grouping of trees.

Natalie

Card Recipe
Stamp: Paper Inspirations
Papers: cardstock (Bazzill Seabreeze), green cardstock (Bazzill), burgundy cardstock (scrap), patterned (BG Figgy)
Ink: Versafine Onyx Black
Accessories: border punch (EK), Spellbinder Nested Pennants & Petite Scalloped Circles Large & Standard Circles Small & Classic Ovals Large, ribbon (Fabricland)

Monday, November 14, 2011

Another Framed Scene


Since these types of detailed images don`t lend themselves to colouring, I try to showcase them by framing them with patterned paper.

Natalie

Card Recipe
Stamp: ?
Papers: green cardstock (Bazzill), off white cardstock (Staples), patterned (MME Christmas)
Ink: Adirondack Raisin Dye
Accessories: Spellbinder Petie Ovals Large & Fancy Tags, Copic marker

Sunday, November 13, 2011

The 25th


I love to incorporate these large number dies into the theme of a card whenever I can.

Natalie

Card Recipe
Papers: red & green cardstocks (Bazzill), white cardstock (Georgia Pacific), patterned (Reminisce)
Accessories: metal embellishment (Making Memories), number dies (PTI), flower punch (MS), border punch (MS)

Saturday, November 12, 2011

Spellbinder Pennants


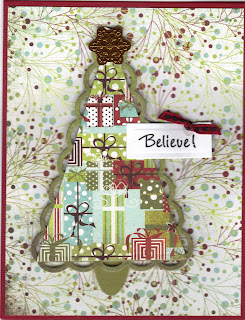
As soon as I saw these dies, I knew exactly what I was going to do with them--make Christmas trees! There are a number of different ways to use these dies, the first of which is with patterned paper. Just be sure to be cognizant of the pattern in the paper so that lines which are supposed to be vertical are not slanted, making the tree look like it`s falling over.

Natalie

Card Recipe
Stamp: Hero Arts
Papers: cardstock (Bazzill Pomegranate, Dark Olive), patterned (BG Figgy Pudding), white cardstock (Georgia Pacific)
Ink: Versafine Onyx Black
Accessories: Spellbinder Nested & Scalloped Pennants, Long Classic Rectangles Small, ribbon (stash), oval punch (SU), star sticker (K & Co.)

Friday, November 11, 2011

All Dressed Up


Dry embossing is still one of my favourite techniques. I used a brass stencil and shims to get a crisp image with my Big Shot. I think the rhinestones make perfect tree ornaments.

Natalie

Card Recipe
Stamp: PTI
Papers: white cardstock (Georgia Pacific), green cardstock (Bazzill), patterned (Reminisce)
Ink: Verafine Onyx Black
Accessories: ribbon (stash), rhinestones (Kaiser), star brad (stash), stencil (Lasting Impressions)

Thursday, November 10, 2011

Holly, Holly


This embellishment was on one of the cards my family received last year. It was too nice to toss so I double matted it to showcase it.

Natalie

Card Recipe
Papers: cardstocks (Bazzill), patterned (Reminisce)
Accessories: Spellbinder Squares and Lacey Squares, button & embroidery thread (stash)

Wednesday, November 9, 2011

It Doesn't Get Any Easier


This was a card I received last year. I merely cut off the card front and trimmed it to fit a new card base. I inked all edges of the trimmed piece to hide any of the white core.

Natalie

Card Recipe
Ink: Colorbox

Tuesday, November 8, 2011

Recycling


Over the next few weeks you will see many Christmas cards, a few of which I made with items recycled from last year. This fabric ornament was on a gift tag. I couldn't just throw it in the garbage and was pleased to find it was a perfect fit for a standard sized card front.

Natalie

Card Recipe
Stamp: PTI
Papers: off white cardstock (Staples), gold cardstocks (stash), patterned paper (Anna Griffen)
Ink: Versafine Onyx Black
Accessories: border punch (SU), brads (stash), ornament (stash)

Monday, November 7, 2011

Smaller Portions


This card was made for my God daughter's wedding. Since the bridesmaids wore purple, I made the flower out of the same colour of felt. Though I didn't know how I was going to incorporated this piece of dry embossed paper, due to it's size, I used a portion of it when cutting it to fit my card front. It isn't always necessary to use the entire image of an embossed design.

Natalie

Card Recipe
Stamp: Inkadinkado
Papers: white cardstock (Georgia Pacific), silver cardstock (stash)
Ink: PSX Royal Purple
Accessories: felt (stash), Sizzix Tattered Flowers Die, stick pin (Jenni Bowlin), button (stash), ribbon (Fabricland), embossing folder (Cuttlebug), embroidery thread (stash)

Sunday, November 6, 2011

Midnight Owl


This ticket image made the perfect size hanging sign for this card design. Once sanded, the underlying colour of the Core'dinations cardstock is revealed, bringing the embossed image to life.

Natalie

Card Recipe
Stamp: Stamper's Anonymous
Papers: black cardstock (Core'dinations Black Soot), orange cardstock (Bazzill), grey cardstock (stash)
Ink: Versafine Onyx
Accessories: embossing folder (Cuttlebug Owl Flourish), Spellbinder Elegant Posts, rhinestones (Kaiser)

Saturday, November 5, 2011

Scaredy Cat


This cat die cut was the perfect fit for my new Hallowe'en sentiment.

Natalie

Card Recipe
Stamp: Impression Obsession
Papers: orange cardstock (Bazzill Yam), yellow cardstock (Bazzill Dandelion), black cardstock (stash), patterned (Heidi Grace)
Ink: Versafine Onyx
Accessories: ribbon (Fabricland), Spellbinder Witch's Brew and Petite Ovals Large and Labels 21

Friday, November 4, 2011

Patterned Pumpkins


This was a great opportunity to use paper piecing. I first stamped the linear pumpkin image on the striped patterned paper and then cut them out to adhere to the image already stamped on the yellow cardstock.

Natalie

Card Recipe
Stamp: Inkadinakdo
Papers: black cardstock (Stash), yellow cardstock (Bazzill Dandelion), patterned (Heidi Grace)
Ink: Versafine Onyx
Accessories: lace ribbon (stash), Spellbinder Labels 18 and Classic Ovals Small

Thursday, November 3, 2011

No. 31


I love using these numeric die cuts from Papertrey Ink. Next time, however, I would have chosen a smaller patterned paper so that the die cuts would stand out more.

Natalie

Card Recipe
Stamp: Hero Arts
Papers: orange cardstock (Bazzill Yam), patterned (Heidi Grace), black cardstock (stash)
Ink: Versafine Onyx
Accessories: Papertrey Ink number dies

Wednesday, November 2, 2011

Pumpkin Carving


The design of this card and the size of the pumpkin warranted a 6 X 6 card base. The "not so busy" patterned paper allowed me to stamp my smaller sentiment directly on it.

Natalie

Card Recipe
Stamps: image (Studio 12), sentiment (Flourishes)
Papers: orange cardstock (Bazzill Mango), black cardstock (Stash), patterned (Echo Park)
Inks: Versafine Onyx, PSX Sunflower, ColorBox Lettuce
Accessories: border punch (EK Success), ribbon (Fabricland)

Tuesday, November 1, 2011

Pointing Something Out


On another card, I appreciated how the point of the witch's hat drew my attention to the sentiment on the card. Placement is everything!

Natalie

Card Recipe
Stamps: Flourishes
Papers: green cardstock (Bazzill Parakeet), black cardstock (stash), patterned (Echo Park)
Ink: Versafine Onyx
Accessories: Spellbinder Classic Ovals Large and Scalloped Ovals, ribbon (Fabricland), markers (Tombow N97, Marvy 87 pumpkin and 63 wine)